ROS2自动驾驶
yolo5自动驾驶
1、重要!更换U盘的操作指引
2、关闭开机自启动大程序
3、Linux基础
4、YoloV5训练集
5、自动驾驶基础调试(代码解析)
6、自动驾驶特调
7、自动驾驶原理
8、PID算法理论
9、阿克曼运动学分析理论
10、建立运动学模型
常用命令
!重要!首次使用
一、原理分析
麦克纳姆轮运动学分析
二、AI大模型
3、AI大模型类型和原理
4、RAG检索增强和模型训练样本
5、具身智能机器人系统架构
6、具身智能玩法核心源码解读
7、配置AI大模型
8、配置API-KEY
三、深度相机
2、颜色标定
10、深度相机的基础使用
11、深度相机伪彩色图像
12、深度相机测距
13、深度相机色块体积测算
14、深度相机颜色跟随
15、深度相机人脸跟随
16、深度相机KCF物体跟随
17、深度相机Mediapipe手势跟随
18、深度相机视觉循迹自动驾驶
19、深度相机边缘检测
四、多模态视觉理解
20、多模态语义理解、指令遵循
21、多模态视觉理解
22、多模态视觉理解+自动追踪
23、多模态视觉理解+视觉跟随
24、多模态视觉理解+视觉巡线
25、多模态视觉理解+深度相机距离问答
26、多模态视觉理解+SLAM导航
27、多模态视觉理解+SLAM导航+视觉巡线
28、意图揣测+多模态视觉理解+SLAM导航+视觉功能
五、雷达
8、雷达基础使用
思岚系列雷达
六、建立地图
9、Gmapping建图
cartographer快速重定位导航
RTAB-Map导航
RTAB-Map建图
slam-toolbox建图
cartographer建图
Navigation2多点导航避障
Navigation2单点导航避障
手机APP建图与导航
七、新机器人自动驾驶与调整
多模态视觉理解+SLAM导航
新机器人自动驾驶
场地摆放及注意事项
启动测试
识别调试
无人驾驶的车道保持
无人驾驶路标检测
无人驾驶红绿灯识别
无人驾驶之定点停车
无人驾驶转向决策
无人驾驶之喇叭鸣笛
无人驾驶减速慢行
无人驾驶限速行驶
无人驾驶自主泊车
无人驾驶综合应用
无人驾驶融合AI大模型应用
八、路网规划
路网规划导航简介
构建位姿地图
路网标注
路网规划结合沙盘地图案例
路径重规划
九、模型训练
1、数据采集
2、数据集标注
3、YOLOv11模型训练
4、模型格式转换
十、YOLOV11开发
多机通讯配置
汝城县职业中等专业学校知识库-信息中心朱老师编辑
-
+
首页
七、新机器人自动驾驶与调整
无人驾驶路标检测
无人驾驶路标检测
# 无人驾驶之路标检测 ## 1. 课程内容 启动yolo交通路标识别程序,教程提供的模型仅识别沙盘套餐自带的路标,如果需要识别其他的路标需要自行训练 ## 2.路标检测 路标检测源码路径: /home/jetson/yahboomcar_auto/src/auto_driver/scripts/auto_drive.py ### 3.程序启动 * 参数配置 参数路径:`/home/jetson/yahboomcar_auto/src/auto_driver/config/auto_drive_node.yaml` ``` turn_radius: 0.4 linear_speed: 0.13 angular_speed: -0.55 duration: 2.0 response_distance_1: 2900 response_distance_2: 132 cooldown_time: 0.2 DEBUG_MODE: False DEBUG_MODE_2: True START_AutoDrive: True Kp: -0.62 Ki: 0.0 Kd: -0.1 max_integral: 1000.0 image_size: [640, 480] ``` 修改完参数之后重新运行launch文件即可使用上修改后的参数 ```启动相机+底盘+自动驾驶节点 roslaunch auto_driver auto_drive.launch ``` 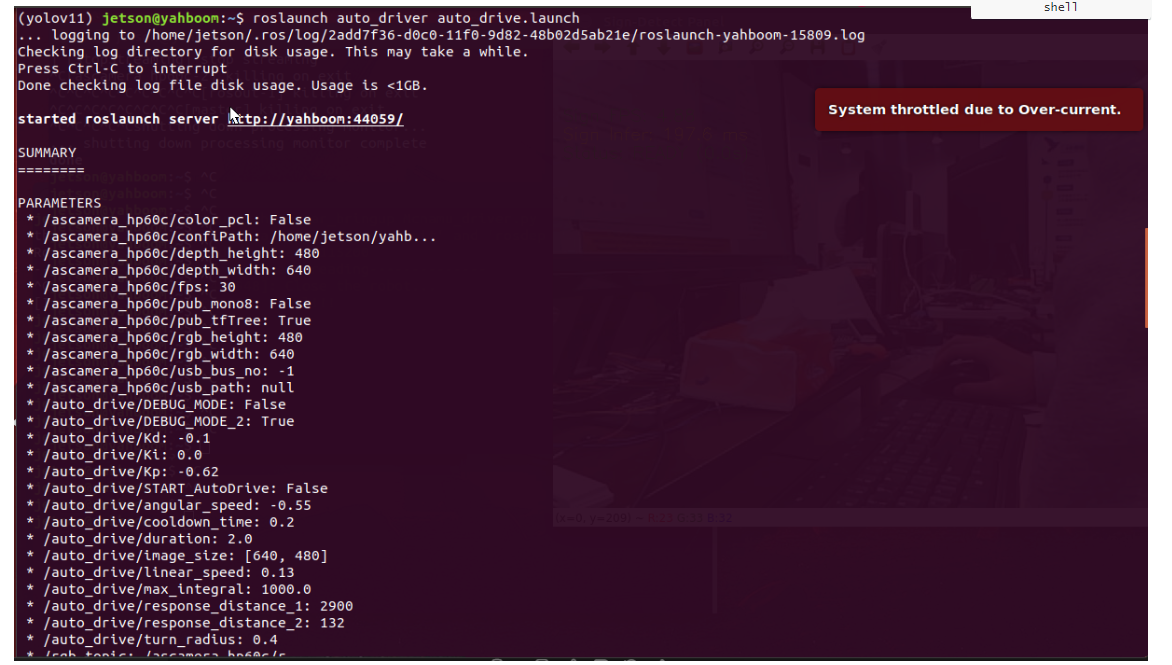 启动成功之后会显示画面不会运动,为了测试路标识别情况。(如果想要运动,将auto_drive_node.yaml的参数START_AutoDrive改成 True) 启动成功之后会出现一个可视化界面  将路标放到画面中间会识别出正确的路标名称,出厂程序默认是同一时间只识别两个路标,是为了自动驾驶过程中出现误识别情况, 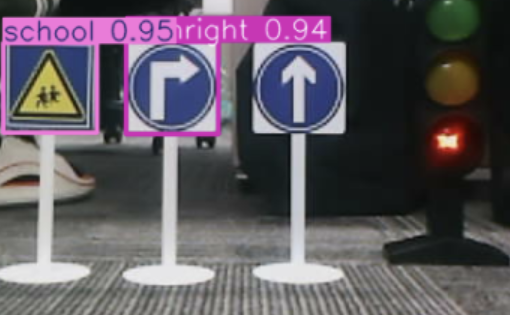 可以通过修改该路径下的yaml文件来调整yolo识别的效果 参数路径:/home/jetson/yahboomcar_auto/src/auto_driver/config/yolo_param.yaml 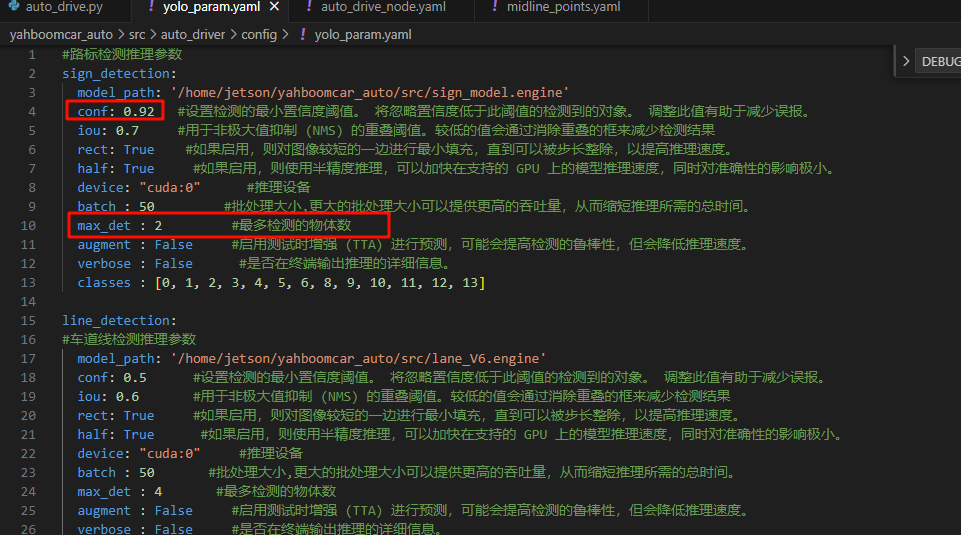 其中max_det : 2 表示最多检测的物体数,conf: 0.92 表示设置检测的最小置信度阈值。 将忽略置信度低于此阈值的检测到的对象。 调整此值有助于减少误报。这里改成max_det : 4之后运行程序,可以看到画面框选四个路标 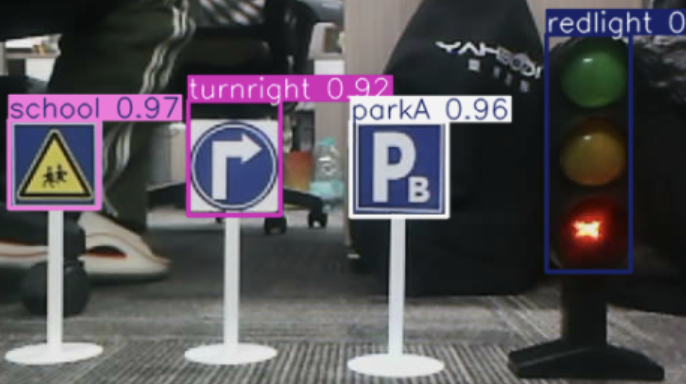 为了后续自动驾驶综合应用这里建议使用2个最大目标 ## 4.源码解析 ### 4.1、auto_drive.py 程序源码路径: `/home/jetson/yahboomcar_ros2_ws/yahboomcar_ws/src/auto_drive/auto_drive/auto_drive.py` 基于ROS的YOLO目标检测节点,专门用于实时检测交通标志。节点接收摄像头图像,使用YOLO模型进行目标检测,并将检测结果发布给其他节点使用。 **多线程处理架构** * **处理线程**:专门进行YOLO推理和结果处理 * **守护线程**:确保程序退出时线程正确终止 * **忽略列表**:过滤不需要处理的标识类型 * ``` def _start_processing_threads(self): '''启动处理线程''' # 标志检测线程 self.sign_thread = threading.Thread(target=self._sign_detection_worker) self.sign_thread.daemon = True self.sign_thread.start() # 事件处理线程 self.event_thread = threading.Thread(target=self._event_handling_worker) self.event_thread.daemon = True self.event_thread.start() ``` **图像回调函数** * 使用`_imgmsg_to_cv2`将ROS图像消息转换为OpenCV格式 * 创建图像副本避免数据竞争 * 将图像放入处理队列供检测线程使用 ``` def image_callback(self, msg): '''图像回调函数''' try: self.cv_image = self._imgmsg_to_cv2(msg) except CvBridgeError as e: rospy.logerr("CvBridge error: {}".format(e)) return ``` **目标检测主循环** ``` def _sign_detection_worker(self): '''标志检测工作线程''' sign_pub_counter = 0 while not rospy.is_shutdown() and not self._shutdown_flag: if self.cv_image is None: time.sleep(0.01) continue # 检查冷却状态 current_time = time.time() if self.sign_cooldown: if current_time - self.last_sign_time >= self.cooldown_duration: self.sign_cooldown = False rospy.loginfo("Sign detection cooldown ended") else: # 冷却期内,跳过标志检测 time.sleep(0.01) continue ``` **结果解析和发布** * **频率控制**:每5帧发布一次,平衡实时性和系统负载 * **数据类型转换**:确保数据格式符合消息类型要求 ``` try: frame = self.cv_image.copy() infer_start = time.time() # 进行标志检测 results = self.sign_detect.get_infer_result(frame, True) annotated_frame = frame.copy() # 记录是否检测到需要冷却的标志 detected_sign_requires_cooldown = False for res in results: if res.boxes is not None: annotated_frame = res.plot() boxes = res.boxes for i in range(len(boxes)): box_coords = boxes.xyxy[i].tolist() class_name = res.names[int(boxes.cls[i].item())] confidence = boxes.conf[i].item() # 检查是否为需要忽略的标志 if class_name in self.ignored_signs: # rospy.loginfo(f"Ignoring sign: {class_name}") continue # 跳过忽略的标志 # 发布检测结果 if sign_pub_counter % 5 == 0: detection_msg = DetectionObject() detection_msg.class_name = class_name detection_msg.confidence = confidence detection_msg.xmin = float(box_coords[0]) detection_msg.ymin = float(box_coords[1]) detection_msg.xmax = float(box_coords[2]) detection_msg.ymax = float(box_coords[3]) self.sign_publisher.publish(detection_msg) # 将检测结果加入事件队列(忽略的标志不加入) if not self.action_running: object_distance = self._get_distance(float(box_coords[1])) obj = Object(class_name, confidence, object_distance) try: self.event_queue.put_nowait(obj) except queue.Full: pass # 设置冷却标志(除了忽略的标志外,其他标志都触发冷却) detected_sign_requires_cooldown = True sign_pub_counter += 1 # 如果检测到需要冷却的标志,启动冷却 if detected_sign_requires_cooldown: self.sign_cooldown = True self.last_sign_time = current_time rospy.loginfo(f"Sign detected, starting {self.cooldown_duration}s cooldown") except Exception as e: rospy.logerr("Error in sign detection: %s", str(e)) time.sleep(0.01) ```
admin
2025年12月7日 10:49
40
转发
收藏文档
上一篇
下一篇
手机扫码
复制链接
手机扫一扫转发分享
复制链接
Markdown文件
Word文件
PDF文档
PDF文档(打印)
分享
链接
类型
密码
更新密码
有效期
AI