视觉识别模块
0、学前先看&供电说明
1、固件下载与烧录
2、安装编程环境
3、调试运行例程
4、离线运行例程
5、Micropython 快速入门
6、GUI程序使用说明
7、二维云台安装教程
8、FPIOA引脚分配
9、RGB灯
10、蜂鸣器
11、按键
12、串口通信
13、I2C通讯
14、PWM
15、WDT看门狗
16、定时器计时
17、傅里叶变换
18、SHA256加密
19、AES加密
20、多线程
21、文件读写
22、图像显示
23、触摸显示
24、摄像头显示
25、图像翻转
26、照相机
27、绘制圆形
28、绘制矩形
29、绘制椭圆
30、绘制箭头
31、绘制十字准心
32、绘制文字
汝城县职业中等专业学校知识库-信息中心朱老师编辑
-
+
首页
28、绘制矩形
## 例程简介 本节我们介绍绘制线条的draw\_rectangle()方法 ## API 文档 ### `draw_rectangle` `image.draw_rectangle(x, y, w, h[, color[, thickness=1[, fill=False]]])` 在图像上绘制一个矩形。可以分别传入参数 `x, y, w, h`,也可以作为元组 `(x, y, w, h)` 一起传递。 * **color**: 表示颜色的 RGB888 元组,适用于灰度或 RGB565 图像,默认为白色。对于灰度图像,还可以传递像素值(范围 0-255);对于 RGB565 图像,可以传递字节翻转的 RGB565 值。 * **thickness**: 控制矩形边框的像素宽度,默认为 1。 * **fill**: 设置为 `True` 时,将填充矩形内部,默认为 `False`。 该方法返回图像对象,允许通过链式调用其他方法。 不支持压缩图像和 Bayer 格式图像。 ## 示例代码 ``` # Import required modules # 导入所需的模块 import time, os, urandom, sys, math # Import display and media related modules # 导入显示和媒体相关模块 from media.display import * from media.media import * # Define display resolution constants # 定义显示分辨率常量 DISPLAY_WIDTH = 640 DISPLAY_HEIGHT = 480 def display_test(): """ Function to test display functionality 测试显示功能的函数 """ # Create main background image with white color # 创建白色背景的主图像 img = image.Image(DISPLAY_WIDTH, DISPLAY_HEIGHT, image.ARGB8888) img.clear() img.draw_rectangle(0, 0, DISPLAY_WIDTH, DISPLAY_HEIGHT,color=(255,255,255),fill=True) # Initialize display with ST7701 driver # 使用ST7701驱动初始化显示器 Display.init(Display.ST7701, width = DISPLAY_WIDTH, height = DISPLAY_HEIGHT, to_ide = True) # Initialize media manager # 初始化媒体管理器 MediaManager.init() try: # 主要的装饰性矩形图案 - 居中调整 # 使用不同深浅的天蓝色营造层次感 # 深色天蓝色 - 中央水平线 img.draw_rectangle(120, 160, 400, 160, color=(0, 191, 255), thickness=2) # 左侧装饰性小矩形 img.draw_rectangle(120, 160, 50, 50, color=(135, 206, 235), fill=True) # 浅天蓝色 img.draw_rectangle(120, 270, 50, 50, color=(0, 191, 255), fill=True) # 天蓝色 # 右侧装饰性小矩形 img.draw_rectangle(470, 160, 50, 50, color=(0, 191, 255), fill=True) # 天蓝色 img.draw_rectangle(470, 270, 50, 50, color=(135, 206, 235), fill=True) # 浅天蓝色 # 中央装饰性矩形 img.draw_rectangle(220, 200, 200, 80, color=(0, 191, 255), thickness=2) img.draw_rectangle(240, 220, 160, 40, color=(135, 206, 235), fill=True) # 连接线效果的细长矩形 img.draw_rectangle(170, 235, 50, 10, color=(0, 191, 255), fill=True) img.draw_rectangle(420, 235, 50, 10, color=(0, 191, 255), fill=True) # 点缀性的小方块 img.draw_rectangle(200, 180, 15, 15, color=(173, 216, 230), fill=True) # 最浅天蓝色 img.draw_rectangle(425, 180, 15, 15, color=(173, 216, 230), fill=True) img.draw_rectangle(200, 285, 15, 15, color=(173, 216, 230), fill=True) img.draw_rectangle(425, 285, 15, 15, color=(173, 216, 230), fill=True) # Update display with background image # 更新显示背景图像 Display.show_image(img) while True: time.sleep(2) except KeyboardInterrupt as e: print("user stop: ", e) except BaseException as e: print(f"Exception {e}") # Cleanup and deinitialize display # 清理并反初始化显示器 Display.deinit() os.exitpoint(os.EXITPOINT_ENABLE_SLEEP) time.sleep_ms(100) # Release media resources # 释放媒体资源 MediaManager.deinit() if __name__ == "__main__": # Enable exit points and run display test # 启用退出点并运行显示测试 os.exitpoint(os.EXITPOINT_ENABLE) display_test() ``` ## 运行效果 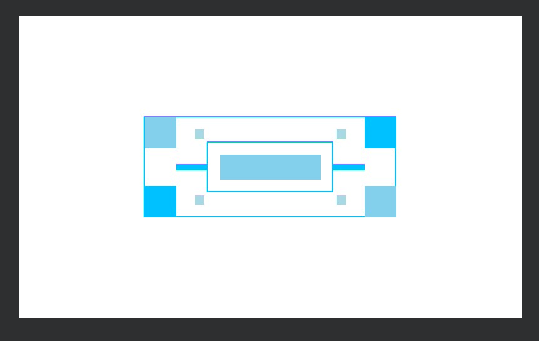
admin
2026年1月4日 08:00
转发
收藏文档
上一篇
下一篇
手机扫码
复制链接
手机扫一扫转发分享
复制链接
分享
链接
类型
密码
更新密码
有效期
Markdown文件
Word文件
PDF文档
PDF文档(打印)
AI